Watercolour is a very popular medium for both beginners and professional artists. To start all you need are watercolour pigments, a brush or two, and a good paper. However that doesn’t mean that the watercolour techniques you can use have to remain basic. There’s a whole experimental side to using watercolours that you can explore by just using items you’ll find at home and they’re pretty simple and easy to do too. Some of the materials might seem odd, but I promise you’ll love the effects they’ll give you. You may not end up using them often, however it’s always useful to know how to do them. Who knows! There may be times when they’re exactly what you absolutely need to complete the look and feel of your artwork.
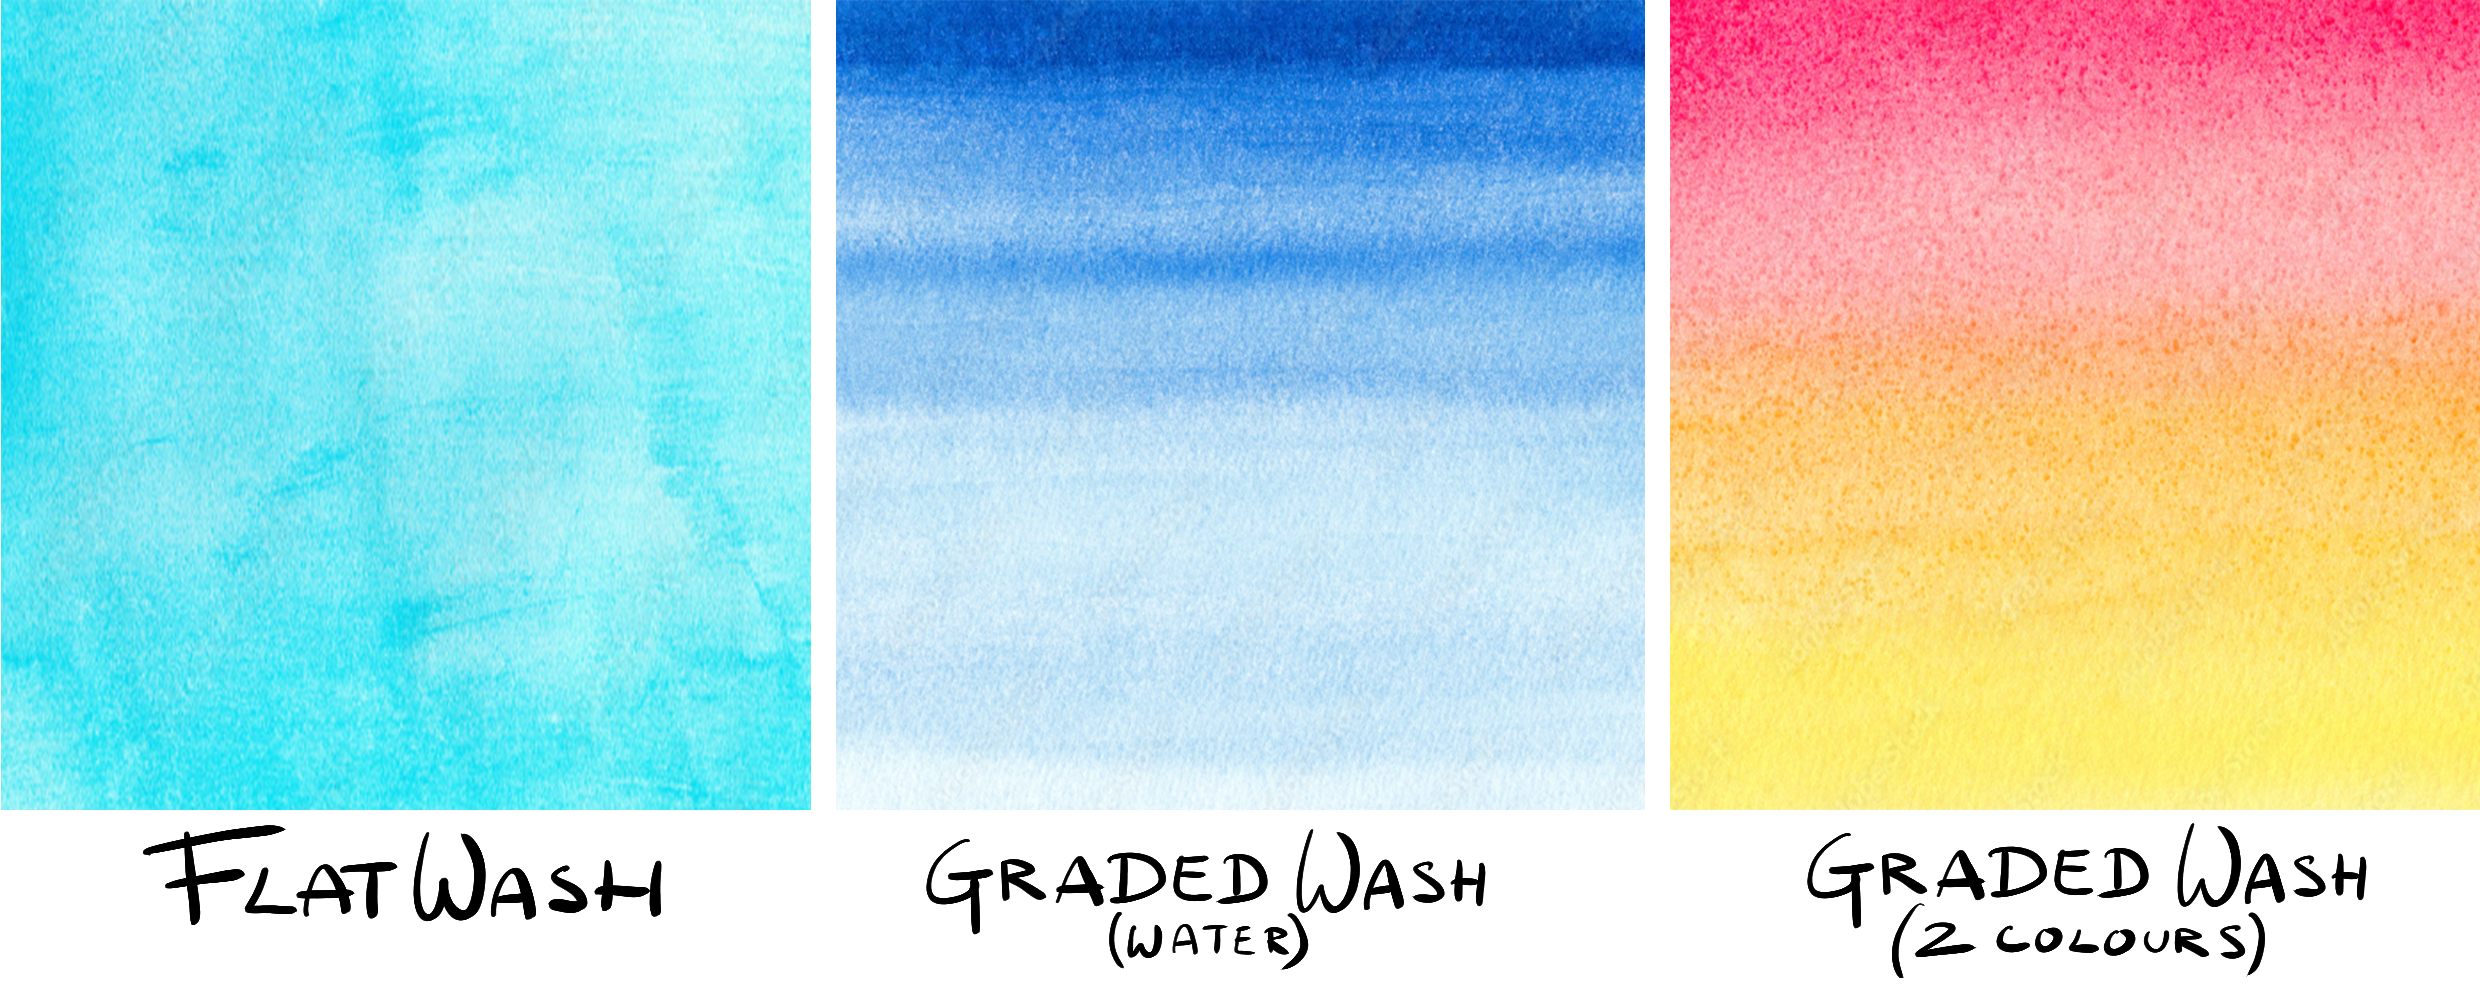
Flat wash
Depending on what effect you want to achieve you can do this with both a wet surface or a dry one. A wash generally doesn’t have to be in one even tone however there are times when you need them to be and this is where flat washes come in. Be mindful to mix enough to cover the whole area that you plan to cover. If you run out mid-way and mix again, the chances of getting the exact water to pigment ratio is very difficult. It’s more likely to end up with a mix that’s a bit lighter or darker than before so plan ahead and save yourself the grief!
Graded Washes
Graded washes are essentially gradients you create using watercolour. You can create gradients with one colour going from very pigmented with less water to watered down with hardly any pigment at all (nearly white). Or one colour smoothly shifting into another – a colour gradient. These colour gradient watercolour effects work best with analogous colours.
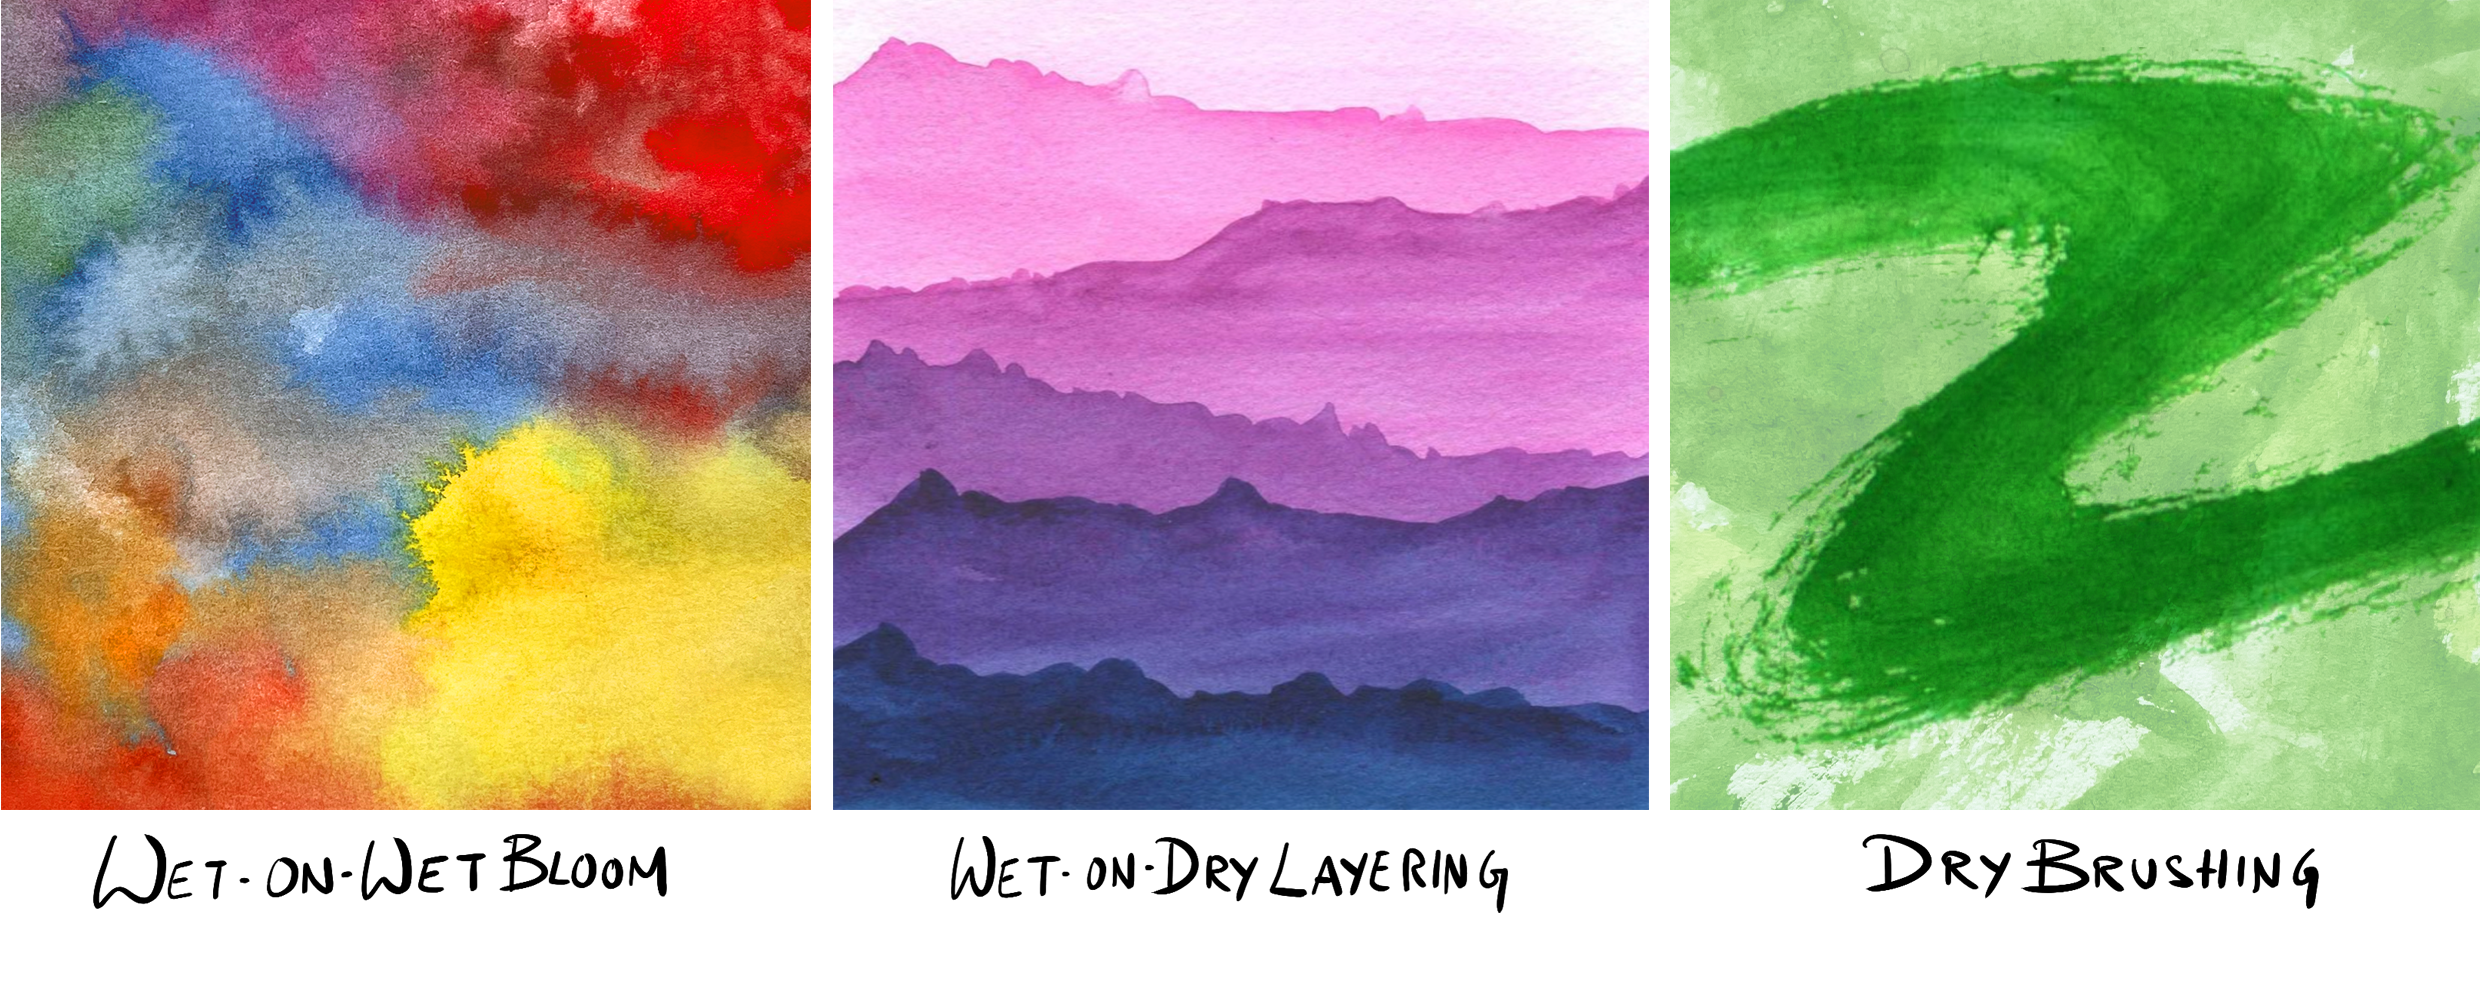
Wet-on-wet
You can already guess from the term, it’s applying your wet colour mixture on a wet surface area. This is a popular watercolour technique as you can create absolutely unpredictable yet beautiful textures and effects. It can be wet from another colour or just wet using clear water. Try them both out to see how the added colour blooms and spreads on the wet surface.
Wet-on-dry
It’s basically applying wet paint onto your dry paper. Edges remain crisp and this is a good watercolour technique to use for creating flat washes. You have more control over evening out your wash than using the wet-on-wet. Akin to glazing in oil and acrylic painting, each layer should be completely dry before adding the next. Otherwise the colours will bleed with each other and you might end up with a muddy puddle instead of a beautiful layering effect.
Dry brushing
It’s exactly as it’s called, using a slightly damp and almost dry brush – not dry – dip it into a thicker paint mixture and use the brush to create texture over the desired surface area. Experiment using the sides of the brush as it’s a great technique for painting the impression of leaves or the textures we find in nature.
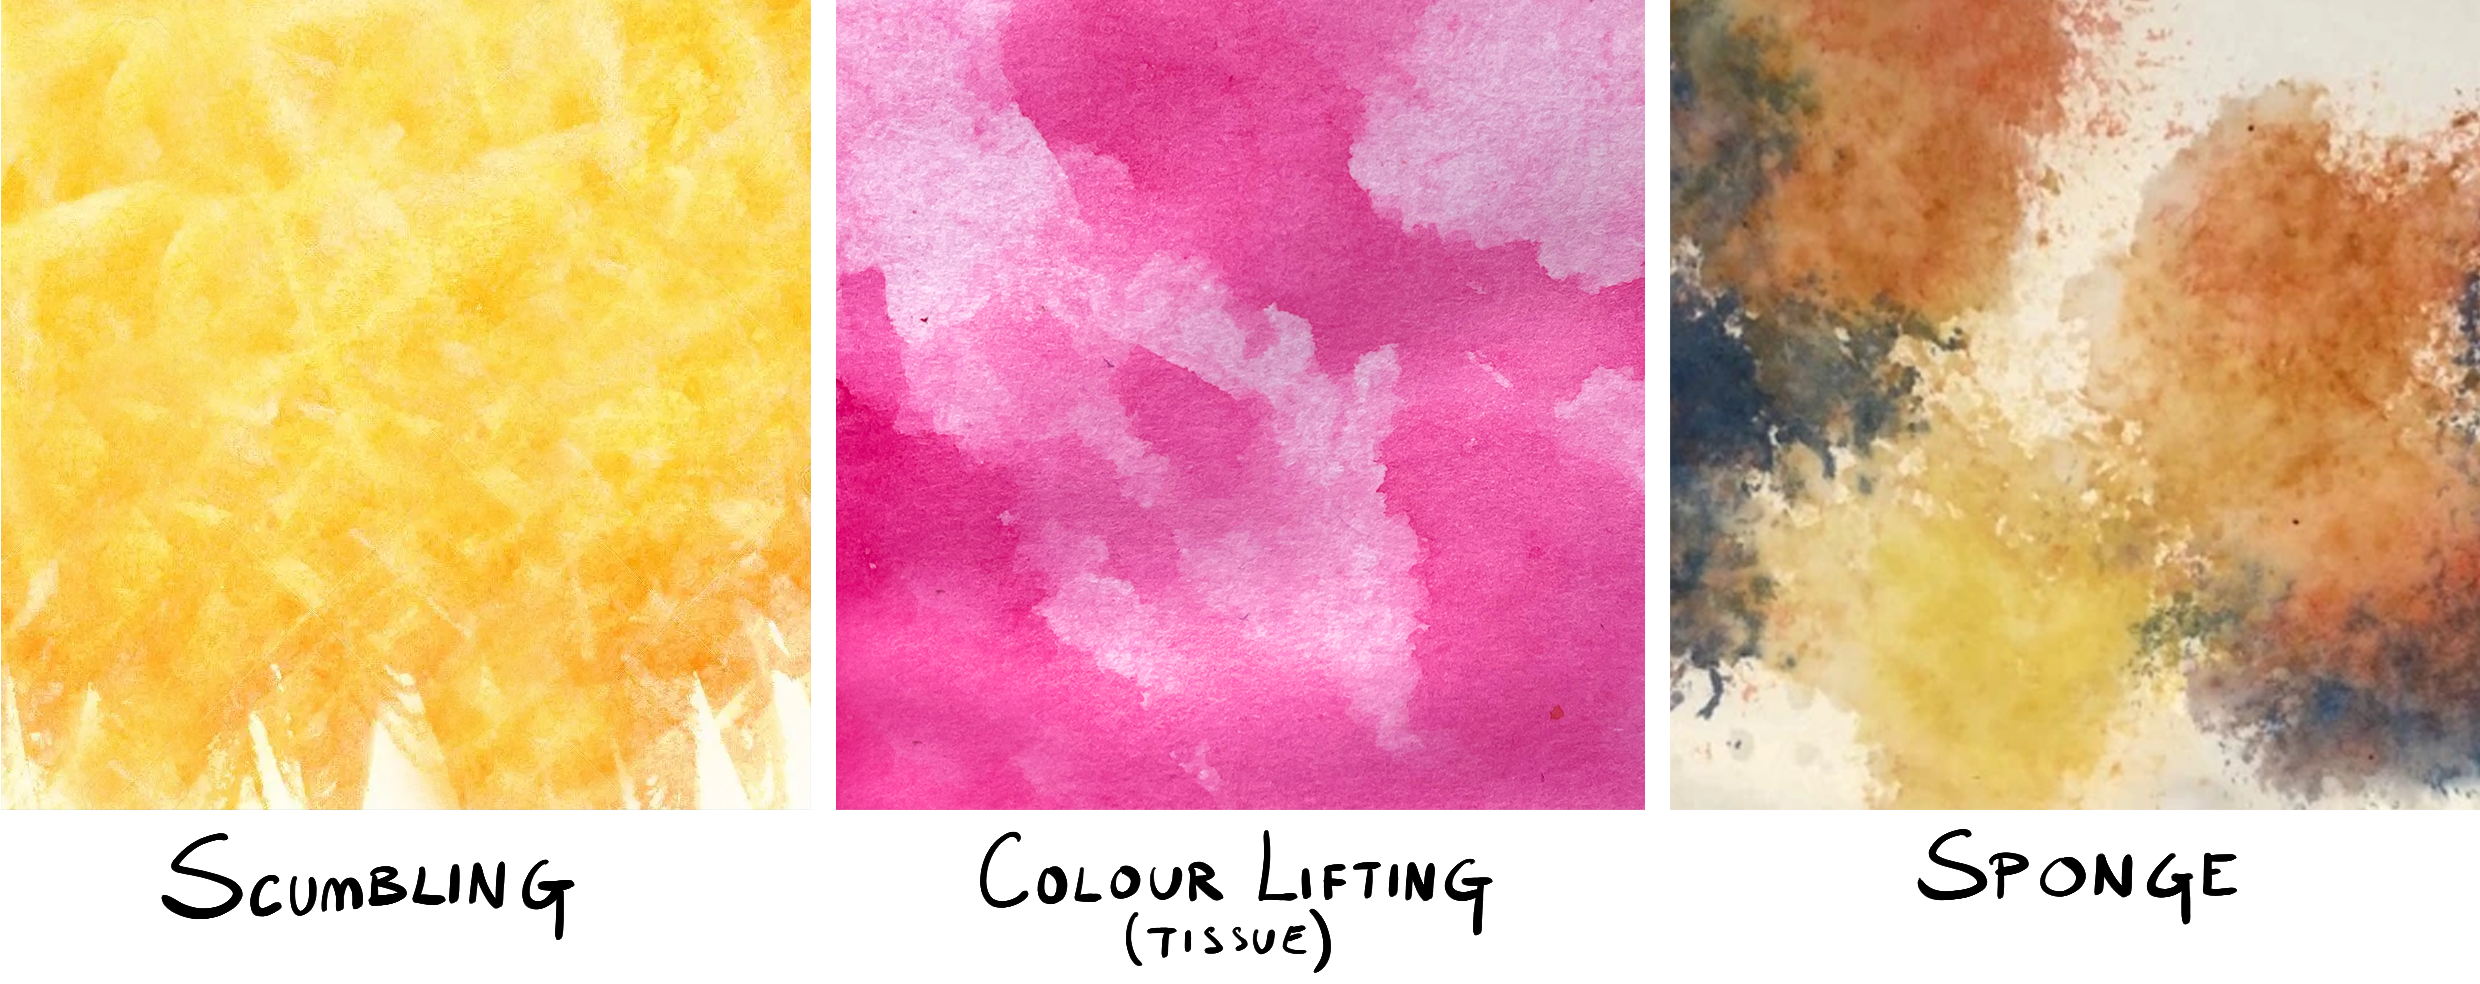 Scumbling
Not only a fun word to say, Scumbling is a technique that’s also popularly used across many mediums to create texture through mark making. The goal is not to create a uniformed look but a more textural effect by applying the paint in a haphazard and less-controlled manner. You can use circular motions, short swishing motions, or a mix of both. The pigment and brush load can also vary depending on your preference and you can also choose to apply it on either a wet or dry surface. Experiment with the different kinds of brushes and brush sizes to see what kind of effect each one gives you.
Colour Lifting
This is often used for making corrections. There are times where you need to lift off some paint from your work. Maybe there’s too much of it, or you want to create a certain effect that you can achieve by lifting off paint. Besides that, I myself usually use this to create soft dappled effects and it’s great for fluffy clouds.
Sponge
Use a clean sponge for this, you don’t want dirty dishwater or your leftover spaghetti hoops to stain your colour. Dip your sponge in the mixture and dab or press it onto your paper. The textural effects you can create will vary depending on how dry or wet your mixture is. And also how much pressure you apply to the sponge when blotting it on your paper.
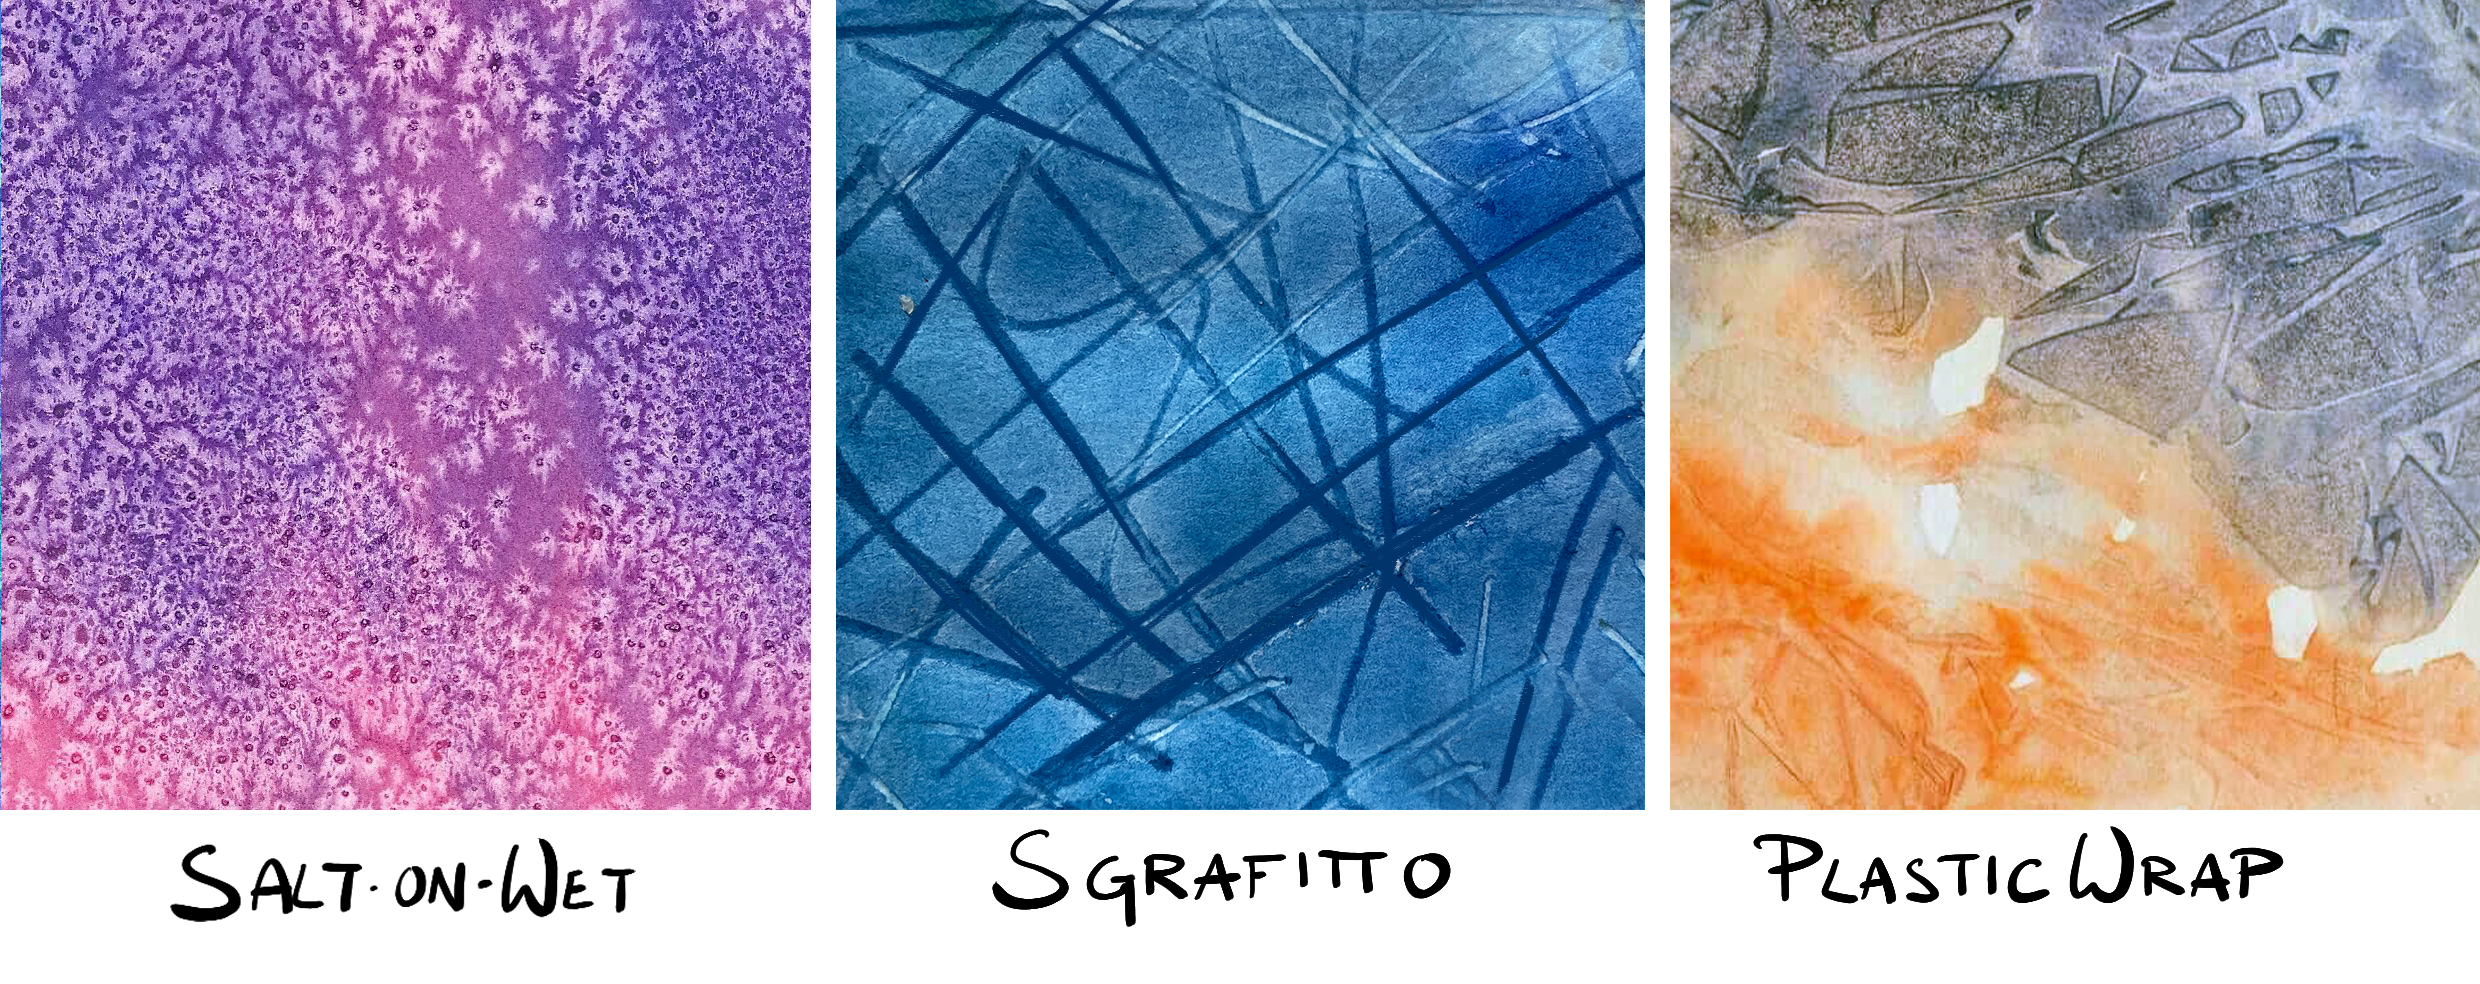
Salt
Using salt is not so uncommon, it’s used by many professional artists to create really interesting textures in their paintings. Coarse sea salt and regular table salt will give you different effects, so experiment with both to see how each one looks and in what way you’d possibly like to use them. Sprinkling on very wet paper and a slightly drier one will also create different effects, just be sure to wait for the paint to completely dry before brushing it off!
Sgraffito
Another fun word, this watercolour technique requires you to make scratches with a sharp tool like a needle or stick, leaving tiny grooves on your paper. By making scratches while the paint is still wet, some of the paint will flow into the grooves. This makes the paint appear darker and will make them look like drawn out lines.
Plastic Wrap
Start by painting the colour that you want on your paper. Then while the paint is still wet, crumple your plastic and press it down on the wet surface. Don’t lift them just yet, wait for the paint to dry. Try to play around with your crumpling to see the various textures you can create, you could even try tin foil or bubble wrap if you’re feeling fancy!
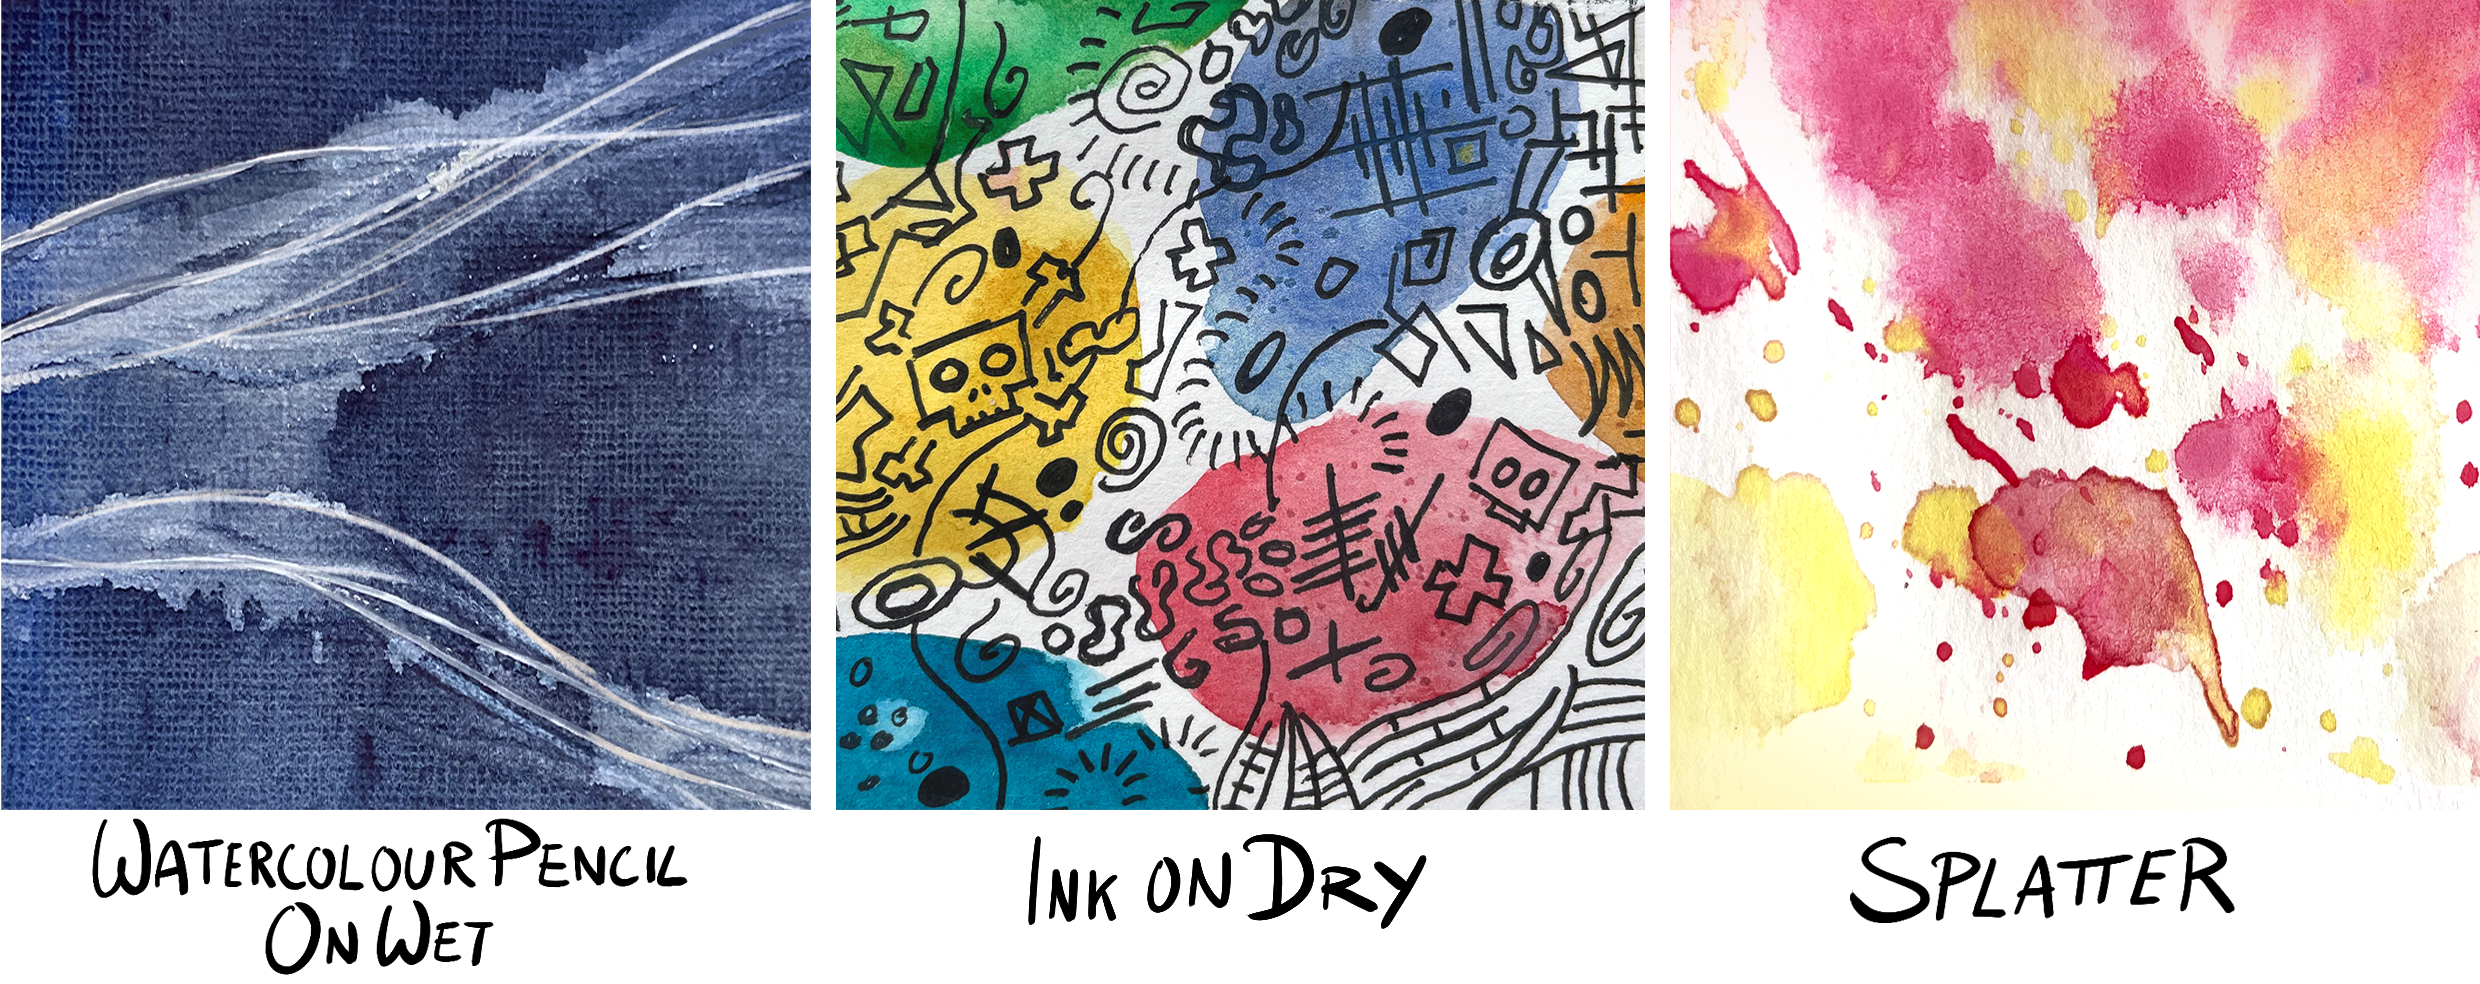
Water soluble pencils
Watercolour or Aquarelle pencils can be applied over wet or dry watercolours to create interesting mark making and textures. Either applied directly on top of a wash to react with a base colour or layered underneath before being activated with a layer of water. Effects like marbling or bark can be created as the two mediums combine.
Ink and Indelible pens
Indelible ink does not run when it comes into contact with water. This is probably the technique I use the most, splashing watercolour on top of an inked sketchbook drawing. Try colour pens to add layers of detailed mark making too, suddenly you won’t need to be quite so precise with a brush when a pen does the work naturally!
Spattering
Load your brush with paint and flick/tap the brush hair using your fingers over the part that you want some splatter on. I find that stiffer brushes give off better splatters, so try using those as well. You can even use a toothbrush for something extra fine, the small and stiff bristles give a nice misty splattering effect. Tip: Splatters are hard to control, so if you want to keep some parts clear – use a stencil or masking.
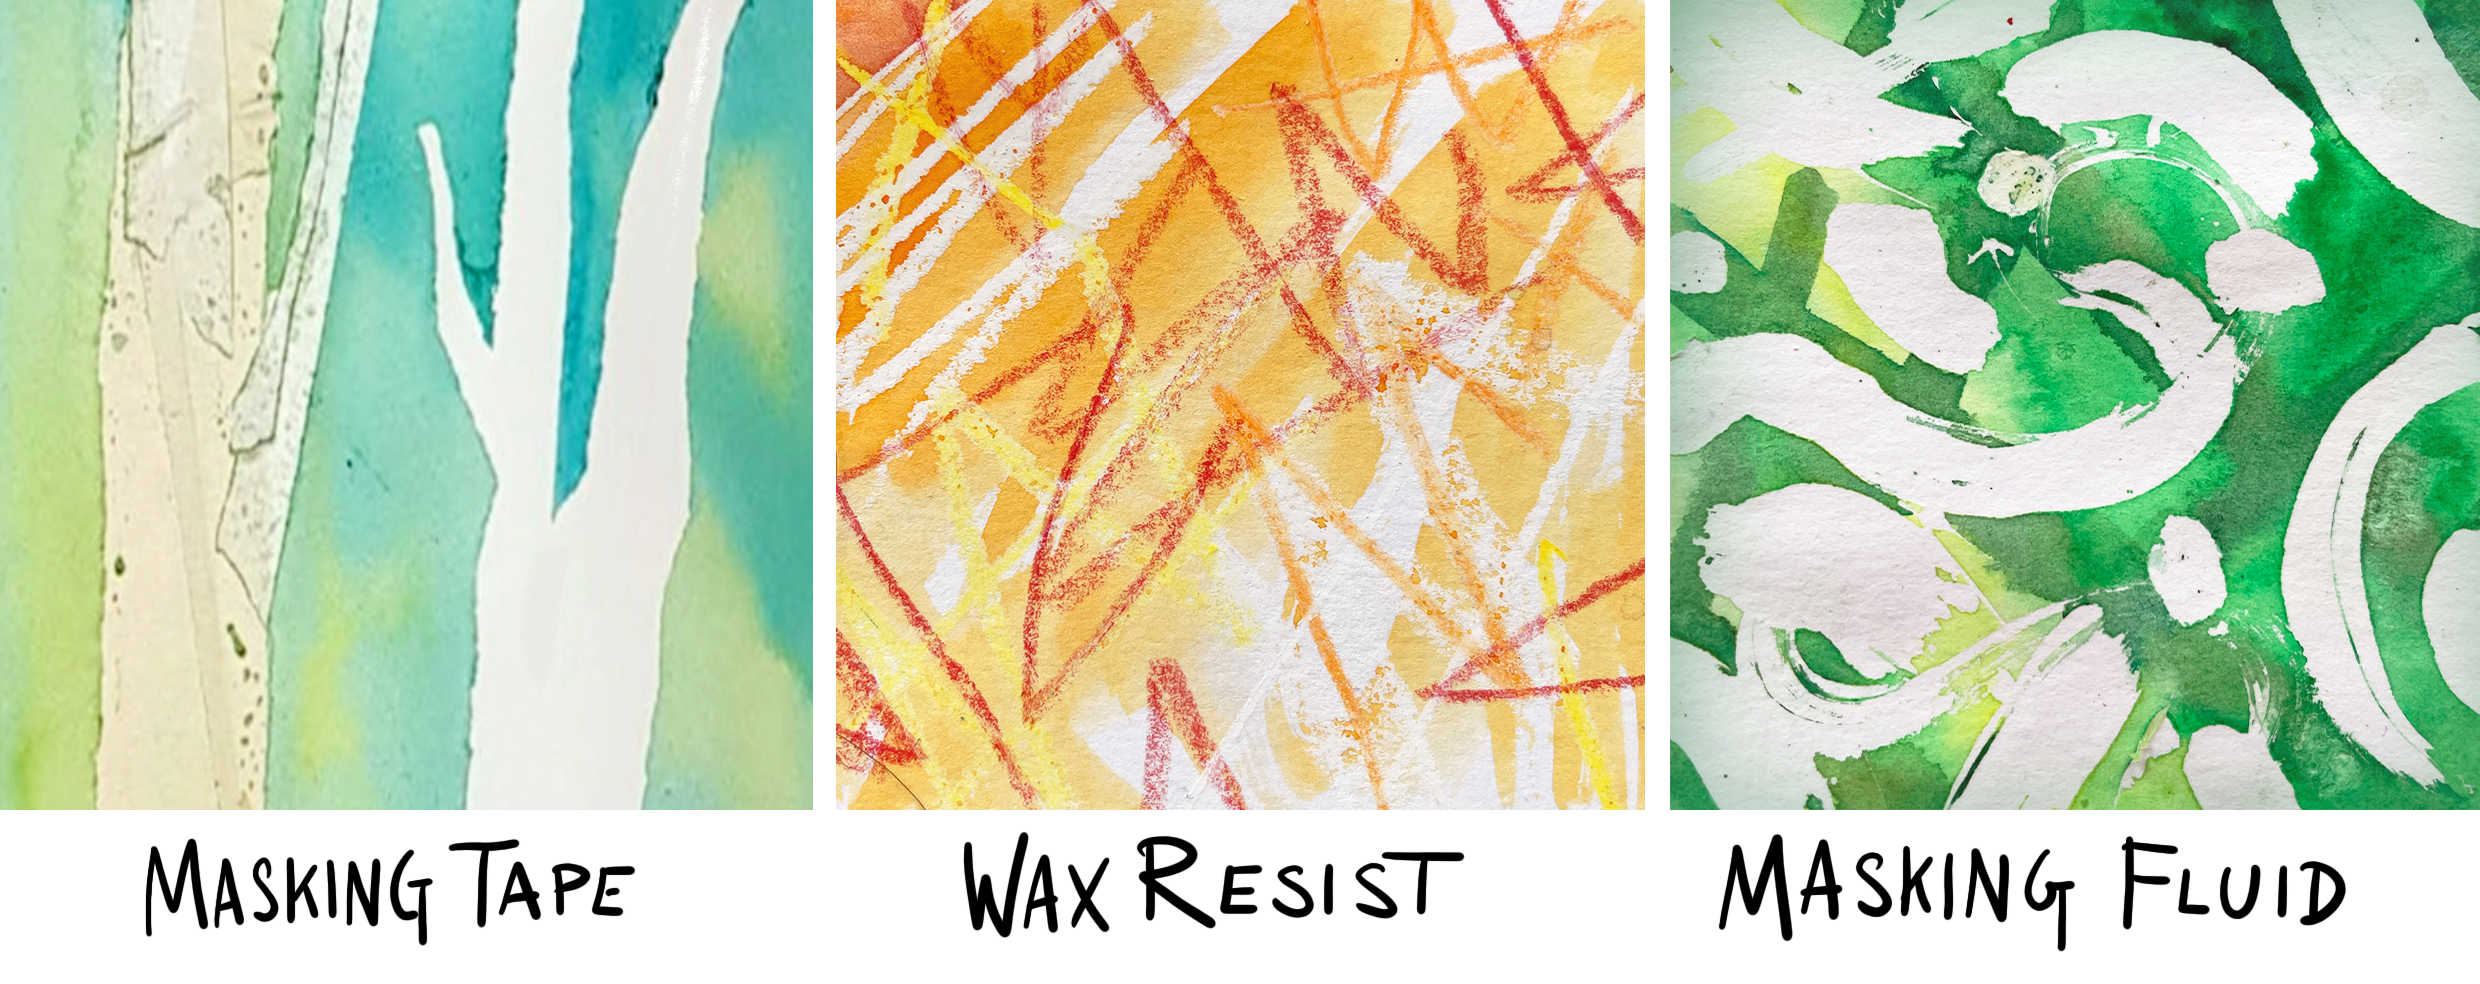
Masking and Watercolour Resist
You can use tape, crayons, candle wax or masking fluid to act as the resisting barrier. The areas where you applied any of those will resist the water and pigment, and will remain white. Just be careful it’s not too sticky or else risk tearing your paper. Washi or Decorating tape for delicate surfaces are a safe bet to keep your edges looking sharp and clean.
Have fun exploring and trying out new ways to use your watercolours. Experiment for yourself and see how you might apply these techniques to your own work. You might just stumble on one that you’ll love and make your own. The important thing is to keep creating, embrace mistakes and enjoy the process!